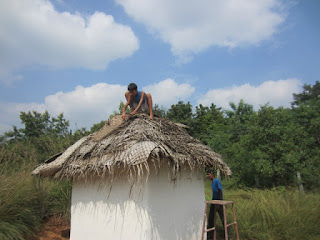
When we started our farm house construction, the kids used to hang out at the site. They were then 13 and 10. A few months into the project, Abhi decided to build something on his own. Aparna soon joined him. We came to know about this when left over material from the house site was getting hauled to a corner, not too far away. Working on and off, it took them eight months, from conception to completion, to build a room that is about 25 sq. ft.
The kids provided the following details about this process:
Foundation:
They dug a foundation trench that was about 1’ wide and 1’
deep. As the soil was quite hard, this digging took about a week. They filled
the trench random rubble and mud mortar. The rubble layer was
raised above the ground by 6”.
 |
| Assessing the use of an abandoned section of a pillar |
Plinth:
Some temporary masonry structures were lying abandoned near
the house construction site. The kids made use of these pieces to construct a
9” band on top of the foundation.
Walls:
About half of the bricks that were used in our farm house
were sun-dried adobe bricks. We got them made on site and they
were one-third the price of burnt bricks. The kids decided to use the left over
adobe bricks and mud mortar for their project. The walls are less than 6’ tall and 9” wide. Protecting
these (mud) walls from rain was their biggest problem. Everyday, after work,
they had to drape the structure with water-proof tarps.
 |
| Maintaining plumb |
 |
| Checking the doorway |
Window/Door:
The entrance is actually at the back. That’s how Abhi wanted
it to be. He built a window frame when the walls were tall enough to have an
opening.
Roof:
Once the walls were completed, there was a long period of inactivity. During this time, there were discussions about the kind of roof they wanted to do and apprehensions about taking it up. While our carpenter's team came to work on the farm house's traditional roof, the kids decided to resume their work. There was plenty of left over timber of odd shapes and sizes to play with. They consulted the lead carpenter for technical details. The roof was built on the ground by constructing a pyramid first. It sat on a stack of bricks. Once the roof was ready, they needed help to mount it on their walls. This was the only time they asked for help from us.
 | ||||||||
 |
| Securing purlins to the rafters |
 |
| Time to admire the roof |
Once the roof framework was in place, mats made of woven coconut fronds (keethu) were tied to it. Abhi sat on the roof and tied the keethu to the purlins
that Aparna was handing him from inside the room. They swapped roles
when they felt like it.
The roof work took several weeks. Once
this was completed, they once again started enjoying the rains without any
worry.
 |
| A picture of the roof taken from inside the room |
Plaster:
They were by now familiar with mud plastering, from watching
the masons at work on the farm house. Sieving the soil, preparing the mix a day
in advance, plastering a wall, cleaning up the tools was their day routine
then. Inside and outside put together, there were eight sides to be
plastered and two levels of plastering to be done, first rough then smooth.
Finish:
They applied diluted lime wash (aka white wash). Lime protects the exposed walls from the rain. This was applied in six thin coats, one coat a day.
| First coat of very dilute white wash |
Floor:
On a leveled substrate of soil mix, terracotta clay tiles were placed with 1 cm gap between them. The gap was later filled with a homemade grout mix that contained finely sieved sand and cement.
Shelves/Niches:
This little space has five storage compartments each one with a flavour of its own.
 |
| Visitors from the neighbourhood |


